How to Descale Your Keurig: Detailed Guide for Thorough Cleanup

Keurig coffee makers are a real lifesaver for people who do not have a lot of time to spend on brewing coffee. This coffee maker can brew your coffee quickly and effectively. However, after using it for some time, you will have to learn how to descale a Keurig coffee machine to keep it on top of its game!
All types of appliances, not just coffee makers, deserve a thorough cleanup every once in a while. Depending on how often you use that appliance, you will have to clean it more or less often. Since I know that you love your coffee maker, you need to make sure that it is working properly and that it is clean at all times.
This is where this guide can help you out! If you are not certain how often to clean the coffee maker, how to clean and descale it, or what to use for the process, I am here to tell you all about it. When you are ready to learn all of this information, move right into the step-by-step guide!
How to Descale Keurig: Step-by-Step Guide
Keurig machines are some of the best in the single-serve pod machine category and are quite durable and will not malfunction easily. If you happen to see that the coffee maker is not working as it should, chances are that the problem is not serious and that a thorough cleanup and descaling can fix it.
There are Keurig models that have screens that display a message when descaling is needed. In case you have one of the machines that do not have a display, you will have to decide when to do the descaling. Let’s see what steps you should follow to make the descaling process a success!
Step 1: Turn the Machine Off
The first thing you should do is turn the machine off. If you just finished brewing your coffee, you should leave the machine to cool down for a couple of minutes before starting with your cleanup. You can even unplug it if you want to be extra safe.
Step 2: Empty the Water Reservoir
You probably know that Keurig coffee makers come with large water reservoirs that do not have to be emptied after each use. The coffee maker is designed so that the water is constantly kept at a certain temperature. However, when it comes to cleaning, you will need to remove the water before doing anything else.
The water reservoir on most of these coffee makers is removable. You should easily detach it from the machine, empty it, and then reattach it. You will need the reservoir for the next step, so make sure that you prepare it before moving on.
Step 3: Fill Reservoir with Descaling Solution

Luckily for all Keurig owners, there is a special descaling solution that you can purchase for a small price and use whenever you need to descale your coffee maker. You do not have to rely on some cleaning solutions that might damage the machine.
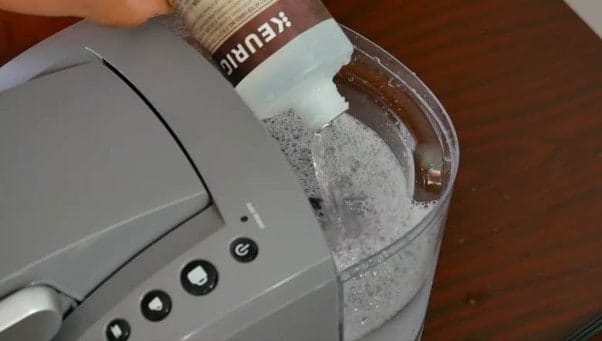
When you get the Keurig descaling solution, you should pour it into the water reservoir. Then, put the same amount of water in the reservoir. You can use the empty bottle of the descaling solution to measure.
Next, you should open the lid and check to see if you have left a K-Cup behind. If you have, you should throw it away immediately, and then close the lid. Once you are sure that the pod holder is empty, you can add a mug to the drip tray and move on.
Step 4: Start the Descaling Process
Turn the machine on and select the largest brew available. Let the machine run this cleansing brew at least a couple of times or as long as it needs to rinse everything thoroughly. You will know when the machine is ready when it asks for more water.
Step 5: Wait It Out
At this point, what you should do is leave the coffee maker to rest for at least half an hour. Turn it off and wait it out. After that half hour, you will have only one more step to finish the descaling process.
Step 6: Rinse Everything
Remove the water reservoir, flush everything in it, rinse it thoroughly, fill it with filtered water, and reattach it to the coffee maker. Then, turn the machine back on, select the largest brew available, and run at least 12 rinsing brews before finishing up.
Here’s the full process.
Here’s another guide you can follow if you have a Keurig 2.0.
Step 7: Clean Needles, Funnel, and Drip Tray (Optional)
Even though this step is not a part of the descaling process, I recommend that you do it from time to time so that you give the coffee maker a complete cleanup. This step does not take that much time or effort, so you will have no problem doing it.
First off, I would recommend that you clean the needle on the lid that is used to puncture the K-Cups. Since the needle goes into the K-Cup, there might be some ground beans attached to it. Using another needle or maybe a paper clip, try to remove any coffee grounds that you might see on that part.
Another thing that you can do is remove the pod holder. At the bottom of it, you will find a funnel as well as another exit needle that might need cleaning. After cleaning them, put the pod holder back together and attach it to the coffee maker.
Finally, I would recommend that you pay some attention to the drip tray. You should clean it thoroughly so that you do not have any coffee residue lingering in that part.
FAQs on Descaling a Keurig
Now that you have seen how to descale your Keurig, I would like to tell you a few other pieces of information that I think would come in handy at some point. Let’s see what else you should know about the Keurig coffee maker and its cleaning and descaling process!
What is in the Keurig descaling solution?
Keurig descaling solution is a concoction of some acids like citric acid, acetic acid, formic acid, glycolic acid, sulfamic acid, hydrochloric acid, phosphoric acid, and a few others that are not that well-known.
This descaling solution is specifically made for these machines, so I would recommend that you purchase it and use it whenever you need to descale your coffee maker. You should not rely on other cleaning solutions as they might not be as suitable for these coffee makers. The Keurig descaling solution is also compatible with every Keurig machine, so you should get it and use it on all the machines you have at home!
Can I use vinegar and water to descale my Keurig?
Sometimes, if you do not have a descaling solution but you need to descale your Keurig right away, you can try doing it with some white distilled vinegar and water. The process is nearly the same – you apply the water and vinegar in the reservoir and run the brewing process without a K-Cup in the machine.
Depending on how long it has been since you last cleaned your Keurig, you can run the brewing process a few times or up to 12 times. After running the process, make sure that you dispose of the vinegar and water from the reservoir or you might end up mistaking it for regular water!
How long does Keurig descaling last?
If you use the descaling solution to descale your Keurig, your machine will be up and running smoothly for three to six months. If you tend to use the machine often, you should descale it again in three months. However, if you do not use it that often, you can let it rest for six or seven months before you descale it again.
A Sparklingly Scale-Free Keurig!
If you read this guide carefully, you should know how to descale and clean up a Keurig coffee machine. Again, I would advise that you follow my guide and use the recommended descaling solution to get the best results and avoid damaging the coffee maker.
In the comments below, let me know which Keurig coffee maker you have and if you have ever tried descaling it at home. Also, tell me if you would recommend going with the descaling solution or if you are fond of using vinegar and water. I cannot wait to read all your comments!
Owen is a writer and editor at Caffe Streets who considers himself a coffee fanatic. He spends his time researching and testing different coffee beans and brewing methods and sharing what he learns with others.


