How to Roast Coffee Beans in the Oven

Every coffee expert will tell you that the best-tasting coffee is the freshest coffee. When you buy coffee in a bag, it is hard to tell when exactly the beans were roasted. Unless you buy coffee from a supplier you know and trust, the best way to know you are drinking fresh coffee is to learn how to roast coffee beans in the oven.
I know what you’re thinking — “there’s no way I can roast my own beans!” While roasting coffee may seem like something that should be left to the true coffee aficionados, it is not as hard as you think. Learning how to roast coffee at home in the oven gives you the unique opportunity to control the roast level and enjoy fresh, personalized coffee whenever you want.
Perfecting the roast may take a few tries to learn the temperament of the beans and the heat levels of your oven. However, once you sip on your freshly roasted, degassed, and brewed coffee beans, it will all be worth it. You can create the perfect light, medium, or dark roasts, based on your preferences.
A top benefit of roasting your own coffee beans in the oven is the wide range of coffee beans you will be able to try. Since you can order raw beans from all over the world, you can experiment with new flavors from your favorite coffee-producing countries. All that’s left is grinding them up in a quality grinder and brewing them to perfection.
Sourcing Your Coffee Beans for Oven Roasting
Before you begin your roasting journey, you need to find some raw coffee beans to roast. If you are new to home roasting, you may not be entirely sure how to complete this step before you get into the actual roasting process.
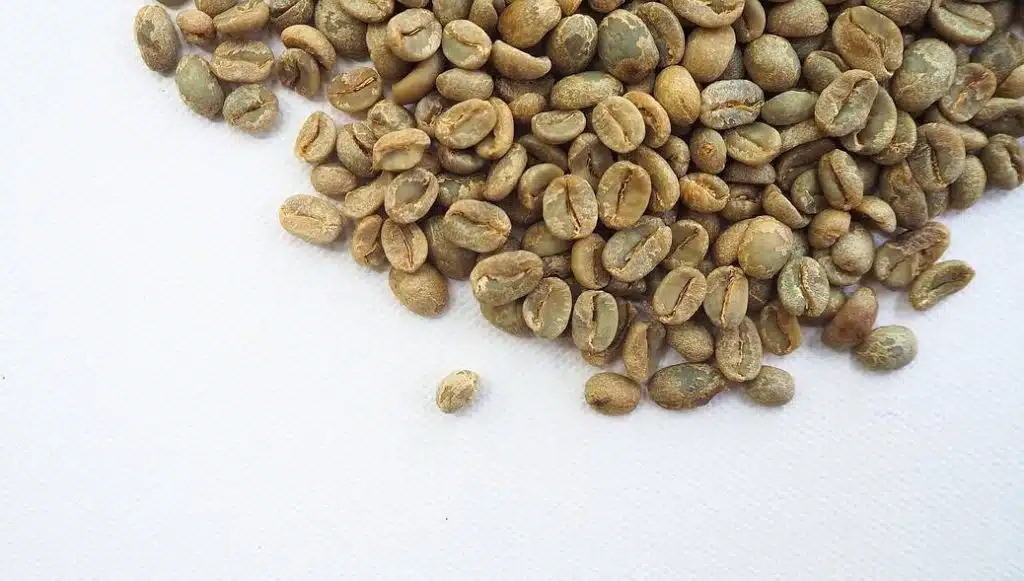
The Raw Coffee Bean
Raw coffee beans are the pips of the coffee plant that are picked when ripe and processed to remove the pulpy layers of the fruit. Growers dry out these seeds roasting.
Raw coffee beans look quite different from roasted beans — they are a green-brown color and smaller than the roasted end product. These beans usually double in size when they crack during the roasting process.
These raw beans can smell quite earthy, fruity, or chocolatey based on the type of bean, origin, and different growing methods. This is the exciting part because you have the opportunity to select a wider range of beans to try for your home brewing.
The raw beans are also more robust than roasted beans, and they can remain fresh for up to 18 months if you store them correctly. You can store these beans the same way you would with roasted beans — in a cool, dark place away from moisture.
How to Source Raw Coffee Beans
Raw coffee beans may not be as easy to find as the roasted alternative. However, once you find a suitable place to source your beans, you have a world of new coffee flavors at your fingertips.
You can start by asking your local roasters if they have any raw green beans they are willing to sell. Certain small, local roasters may be willing to sell off some of their raw beans, especially if you have a relationship with them.
Alternatively, you can order raw beans online on platforms such as Amazon. This will give you a wide range of options to choose from.
Choosing the Right Raw Beans
When selecting raw coffee beans to buy, you can consider a few things to help you choose the right ones. If you want to take the safe option to practice and get your roasting techniques right, try to find your favorite roasted beans in their raw form.
This will help you navigate the roasting process since you will have a good idea of how the roasted beans should taste. You will then be able to tweak your roasting process to perfection before trying out new flavors and beans.
If you are ready to dive in with some new beans, then you will need to decide whether you want to roast Arabica or Robusta beans. These two main varieties of beans offer unique characteristics.
Arabica beans are the premium coffee bean in expert circles because of the growing process. These beans grow in specific conditions, which are often tricky to navigate.

The perfect growing conditions for Arabica beans are on steep slopes and hilly areas with lots of shade. These beans offer more complex and premium flavors and are often found in specialty coffees.
Robusta beans, on the other hand, are hardier and can easily grow in less prime conditions. These beans are often found in flatter areas closer to sea level and do not need as much shade. They offer a flatter taste but contain more caffeine. Robusta beans are often added to blends to add weight and caffeine.
If you are unsure where to start, take your favorite beans and look for raw bean options from the same growing region for a similar flavor profile.
Once you have found the right raw beans, you are ready to learn how to roast your own coffee beans in the oven. A quick warning: you may not want to go back to pre-roasted beans after learning this skill.
How to Roast Coffee Beans in the Oven
Roasting coffee beans in the oven is not necessarily hard to do, but the tricky part is perfecting the roast. Getting your temperature right and hearing the crack may take a bit of practice, so don’t give up after one bad batch.
Before you get started, keep in mind that roasting your own coffee beans in the oven can become a very messy task, so prepare for a bit of a clean-up afterward.
Even more important is the ventilation in the room. Roasting beans using any method will cause a lot of smoke, which could become dangerous if you don’t have adequate ventilation.
So start by opening your windows wide or preparing your outside oven (if you have one) and get ready to roast!
What You Will Need
- Your raw coffee beans
- A pair of oven mitts
- A flat roasting tray with tiny holes
- Two strainers
- A wooden spoon for stirring
Now that you have all your tools ready, you can start roasting your beans and getting everyone’s attention in the house with the smooth aromas that will seep out of your oven. Be prepared to smell fresh coffee for a few days after roasting.
Step 1: Prepare the Oven
The first step is to preheat your oven to anywhere between 385°F and 500°F. The temperature you choose will depend on the roast level you are after and how you would like your beans to taste.
This step will take a lot of practice to perfect, and you will need to try out a few temperatures to produce the beans you prefer the most. A general idea of temperatures and roast levels is:
- Light roast: 385°F – 401°F
- Medium roast: 410°F – 426°F
- Dark roast: 437°F – 500°F
Step 2: Measure Your Beans
Measure out the right amount of raw beans for your batch of roasting. You can measure out how much coffee you would like for the next few days or the week, based on how often you will be roasting new beans.
Freshly roasted beans will be good for up to three weeks, but you will need to balance the amount with the space in your oven. You should only roast as many beans as can fit in a single layer on your tray.
Overcrowding the tray will lead to an uneven roast with some beans under-roasted and others burnt. Burning will create foul-tasting coffee.
Also, keep in mind that the beans will double in size when roasted, and they will also decrease in weight. A roasted bean is double the size and half the weight of a raw bean. You can use that to measure out how many brews you will get out of the raw beans based on your brewing method.
Step 3: Begin Roasting Your Beans
Spread your beans across the roasting tray in an even single layer. If you have a tray with small holes in the bottom, this is perfect for getting an even roast while letting the beans breathe.
However, the holes need to be smaller than the beans so that they don’t slip into the hole while roasting. If beans get stuck in the holes, they will most likely burn and ruin the whole batch.
Place the beans into the preheated oven on the middle rack to allow them to heat at an even temperature.
Step 4: Time and Shake
While the beans are heating up in the oven, set your timer for a minute or two and shake the beans up when the timer goes off. You can either use the oven mitts to shake the tray or stir them with a wooden spoon.
The oven and the temperature you are using will determine how many times you stir or shake the beans. If the temperature is higher, you need to remember to shake them more often.
Step 5: Listen for the Crack
The most exciting time when roasting your beans is listening out for the “first crack.” You need to pay careful attention, as this is how you can keep track of the roast level. Somewhere between five to seven minutes after you place the beans in the oven, the beans will crack.
This first crack is when the bean begins splitting open slightly, and it is an indicator of the bean reaching a light roast. The sound is like a soft popping noise. If you want a light roast, then wait another minute before removing the beans from the oven.
Step 6: Wait for the Second Crack
If you want a darker roast, you will leave the beans in for longer while waiting for the second crack. After another eight to twelve minutes, you will hear a softer popping sound with a bit of a crackle.
This sound indicates the second crack, which is when the bean reaches a little over medium roast. At this stage, you should keep a keen eye on the beans to monitor when they reach your desired roast color.
Remove the beans just before they reach your preferred color. The beans will continue roasting a little longer out of the oven.
Step 7: Remove and Shake
Remove the beans from the oven using the oven mitts, and shake them up. This is where the messy part comes in. The beans will have dried skin falling off, which is called the chaff. It is important to remove as much of this skin as possible.
Transfer the beans to the first strainer and start shaking them over the sink or outside. You will notice the chaff falling off. After about 30 seconds of this, transfer the beans to the second strainer and keep shaking.
You can also gently blow on the beans to help remove the chaff while you shake the beans. This will also help cool the beans down to prevent them from roasting even more.
Step 8: Let the Beans Degas
Right after roasting, the beans start releasing carbon dioxide. This is known as the degassing stage. Beans can take anywhere from 12 to 48 hours to release all the gas. During this time, you should keep the beans in an open container with a paper towel over to let the beans breathe.
If you can wait that long, leave the beans for at least 24 hours before grinding up in your favorite grinder and brewing the beans with your desired brewing method.
If you think you’re going to continue roasting your own beans, why not invest in a coffee roaster? That’s going to level up your roasting game real quick. Or, if you’re interested in trying out other roasting techniques, check out our post on roasting coffee at home.
Roast Levels When Roasting Coffee in the Oven

When roasting your own beans, it is essential to be aware of the roast level. The beans will go from a light roast to a dark roast within minutes, so you may end up with unusable burned beans if you are not paying attention. The roasts are as follows:
Cinnamon Roast: This happens at the first crack when the sugars inside the beans start to caramelize. You will hear a distinct popping sound when this happens.
City Roast: A city roast happens soon after the first crack, and this is the minimum roast level for a light roast. This happens 30 seconds to a minute after the first crack.
City Plus Roast: If you leave the beans for longer, they will reach a City Plus Roast. These beans have better caramelization.
Full City Roast: If you want a darker roast that is closer to a medium roast, go for the Full City Roast. These beans are on the verge of the second crack, and it may take practice to pull the beans out at the right time.
Full City Plus Roast: This roast is when the beans reach the second crack and are prime for a medium roast. This roast releases the complex and intense flavors of the beans.
Dark Roast: Moving beyond the second crack, the beans move into dark roast territory, which is also known as a French roast. During this stage, the sugars have burned as far as possible, and the smoke becomes pungent. These beans are optimal for an espresso brew.
Burned: Beyond the dark roast, the beans will begin to burn and spoil. If you forget your beans roasting, you may notice a terrible smell from the oven. Once the beans are burned, there is nothing you can do to salvage them.
How to Roast Coffee Beans in the Oven FAQs
Is roasting your own coffee worth it?
Yes, if you want to enjoy fresh coffee at home, then roasting your beans is the best way to enjoy the freshest coffee. Roasting coffee beans in the oven at home gives you full control over the roast level and flavor of the coffee.
What temperature do you roast coffee beans at?
The temperature for roasting coffee beans in the oven depends on your roast level, and it can vary anywhere between 370°F to 500°F. You will find the right temperature for your favorite roast through practice.
How soon after roasting can you brew coffee?
Many people have varying ideas of how long you should wait before brewing freshly roasted coffee. You should wait at least 12 hours to allow enough gas to be released. However, some roasts can take 48 hours to properly degas. The darker the roast, the quicker the gas releases.
Ready to Roast?
Equipped with all this new information, you can easily become an expert home roaster, but it will take practice and patience. Each time you attempt roasting in your oven, take note of how long it takes and tweak the timing and temperatures to find the sweet spot for your beans.
Practice some patience while you wait for the beans to degas and then grind and brew your beans with a quality coffee maker.

Owen is a writer and editor at Caffe Streets who considers himself a coffee fanatic. He spends his time researching and testing different coffee beans and brewing methods and sharing what he learns with others.


